Thursday, February 23, 2017

Polaris TR36P Pressure Side/Return Side Cleaner Review

The Polaris TR36P is the latest Pressure Side (Return Side) cleaner on the market and it is an excellent automatic cleaner. The TR36P is sold only at your local brick and mortar pool store not sold online. It is part of Zodiac/Polaris Trade Series Exclusive Line-Up.


The Polaris TR36P does not require a dedicated return line connected to a separate booster pump. It works off of your existing pool pump and easily connects to your pools 1 1/2” threaded return lines. It does not connect to your pool's skimmer or side port like a traditional suction side cleaner.

This feature makes the TR36P unique among Pressure Side cleaners. It also makes the TR36P ideal for a pool that is already constructed and a separate booster pump cannot be added. The nice thing about the cleaner is that while it is running in your pool the skimmer will be fully operational with complete suction. The TR36P works off of the return line of the pool.

The TR36P comes is a very nice dark color scheme. The hoses are black and the cleaner sports black wheels with a dark blue body. It is just an overall sweet looking cleaner. And not only does it look good but it picks up leaves, dirt and debris exceptionally well. You can see it in action in the video.

The cleaner is powered by 3-venturi jets that funnel the pool's return water making a powerful spray like a garden hose nozzle and pushing the debris into the large debris bag on top of the cleaner. It is a highly effective design and the same one that is used on the Polaris 360. It comes with an extra debris bag in the box as an added bonus which is just perfect.

It also comes equipped with the Tail Sweep Pro which does not come standard on any of their cleaners except the Polaris 3900 Sport. The Tail Sweep Pro will allow for full water flow to the tail but it is designed to prevent water from shooting out of the pool and onto the deck and your backyard windows.  It is another nice touch by Polaris.

If your pool has 1 1/2” threaded return lines and you get a lot of debris on the bottom of the pool, the TR36P would be ideal. I prefer installing the return side cleaners in pools that get large leaf debris as the traditional suction side cleaners usually get clogged up with debris. The large debris open will allow for piles of leaves to be pushed up into the cleaner without clogging it up.

The large debris bag on top holds a surprising amount of debris and it also traps sand and dirt very well. I don't know the exact micron level of the bag but it does a great job with sand and dirt as well as leaves. The bags are also very long lasting and very easy to empty.

The cleaner itself is designed to last for many years and replacing parts is very easy. I would say you will get a good 3-4 years out of it running 6 hours a day, seven days a week before you will need to replace some parts. It is extremely well made.

Also since no separate booster pump is required, you will save on your energy cost. The TR36P will run while your pool pump is running. It is also one less future expense as you will not need to replace the booster pump motor after a few years.

The Polaris TR36P is a Top Pick for 2017 and you will love how it leaves your pool spotless every week. This is a great addition to the Polaris cleaner family so stop by your local pool store and check it out.

Thursday, February 16, 2017

New or Used Service Truck, Which is Better?

So is it better to buy a new service truck or a used one for your business? Pretty much hands down you are better off buying a used truck. The debate of new verses used is pretty one sided in my opinion. Here are some things to chew on when deciding for yourself.


That new truck smell is intoxicating. The Odometer at 000006 is so cool. Everything looks just perfect. But when you drive it off the lot you have just lost $3,000- $5,000. Don't believe me, try selling it back to the dealer after 2 months and you will see this is a fact.

A new truck will lose half of it's value in the first two years. Yes, you get a reliable vehicle and you won't really need to do any maintenance for a couple of years but you pay for it. What about the 50,000 or 100,000 bumper to bumper warranty? Chances are you will never use it, that is why they give it to you. And you pay for that also in the vehicle mark-up.

Edmunds.com has a good article on the sweet spot for buying a used car. It falls right after year two of the model year. So a 2015-2014 truck would be ideal for the 2017 model year.


Buying a used service truck is the way to go. You let someone else take the hit on the first two years of depreciation and you also get it at a much lower price. I suggest you save up cash to buy your service truck. 

I bought my 2005 Nissan Frontier cash 11 years ago and haven't had a payment since. As you can see from the video if I purchased a new truck every 5 years and made the average payment of $479 each month I would have paid close to $64,000 over that period. Instead, I have payed $00.00.

Of course there is maintenance cost for an older vehicle. I just had new tires put on for $700.00 but that is still less than 2 months of truck payments. I figure I average about $1,500 a year on maintenance, some years lower than others of course but I think that is a fair average. Even with a new truck with the amount of miles you will put on it there will some maintenance costs. So overall keeping an older truck running is still much cheaper in the long run.

My truck has close to 200,000 miles on it and I have changed a ton of parts on it. But it still looks and runs good and I plan on keeping it for another 5-8 years if I can. There really is no good reason to get rid of it and I am driving it into the ground as it is. The mileage alone will destroy the value of any service truck.

And speaking of mileage the IRS is generous enough to give you a 53.5 cent deduction per mile for the 2016 tax year. But the IRS will only allow you to deduct either the vehicle expenses or the mileage but not both. 

So if you think that by deducting your truck payments you are driving for free your not really. Because you will loss the $7,000 to $10,000 mileage deduction off of your gross income which will drop you down 4 or 5 tax brackets. So making payments and deducting them is actually causing you to loss more in the long run.

So before you get truck fever and go out and buy that nice new service truck, add up the actual cost of it. Include higher insurance and registration rates as well as the loss in value in the first two years. If you afford to burn money then go for it. If you would rather save that money and put it to better use, buy used verses new.


Monday, February 13, 2017

How to Wire a Pentair SUPERFLO® VS Variable Speed Pump

What makes the SuperFlo VS Variable Speed pump unique is that it can run off of 115 volts or 230 volts without any problems. It is the only VS pump on the market that can actually work with older pool equipment set up on a 120 volt breaker. 


This makes the SuperFlo VS perfect for your older pool which is probably equipment with a pump that is sucking a lot of power as it is running.
Many of my customers have wanted to switch to a Variable Speed pump to save money on their energy cost but couldn't since a traditional VS pump uses 230 volts to operate. Actually running a pump off of 120 volts is very inefficient so the SuperFlo VS makes switching pumps even more attractive.


The wiring of the SuperFlo VS couldn't be easier. There are just 3 connections inside, one for the green ground wire and two others for the load wires. The beauty of this pump it that all you need to do is connect the green ground wire to the green screw and it doesn't matter where you connect the other two Load wires.

So if you are running 115 volts you would connect either the white or black wire to either Load (L1) or Load (L2). For a 230 Volt wiring you can connect the black wire and red wire to either L1 or L2. Sometimes you will have two red wires with 20 Volts and sometimes you will have odd colored wires with 115 Volt connections. It really isn't a big deal as the wiring scheme is very simple.

If you are connecting the SuperFlo VS to an automated system/ external control you will need to order the Pentair External Wiring Kit #353129Z. The wiring diagram for the relays can be found in the manual. It is not overly complicated but it would be best if you contacted a certified Pentair Warranty Installer so they the pump is connected properly. For most homeowners you will be using the Pentair SuperFlo VS to replace your existing pump connected to a standard time clock.


A couple of things to note. The wires need to ge pretty high up in the back of the motor, so make sure you have enough slack on the wires. You may need to replace them if you don't. Also, make sure you connect the bonding wire to prevent potential electrical shock. It is rare but can happen.
Note that most people will use 120/115/110 volts interchangeably which is referring to the same thing. A 120 volt breaker is what your household plugs work off of. But the power does drop down to 115 volts and the 110 volts reference is old and has stuck around. 220 volts is the same as 230/240 volts but 208 volts is different. I am always saying 110 volts in my videos out of habit.

Related Videos:
SUPERFLO® VS Variable Speed Pump - Overview & Features: https://youtu.be/QJK0kVPpEoE
SUPERFLO® VS Variable Speed Pump: Plumbing in the Pump: https://youtu.be/Pb1OTS0nYMg
SUPERFLO® VS Variable Speed Pump Operating and Programming: https://youtu.be/JzDw3abs6O8


Thursday, February 9, 2017

Pentair SUPERFLO® VS Variable Speed Pump Operating and Programming

The Pentair SuperFlo VS Variable Speed pump is very easy to program and set up. Pentair has gone to great lengths to make this pump as user friendly as possible. The programming that I show is based on the pump not being connected to an automated system like the IntelliTouch or EasyTouch, for that set-up you will need an External Control Wiring Kit.


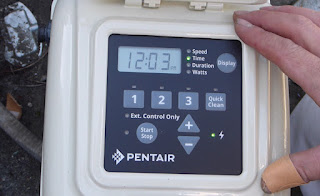
I think most consumers will be using this pump as a stand alone and the video will cover the programming of the pump. The Control panel as been simplified for easy set-up so the first thing you will need to do once the power is on to the pump is set the clock. Simply press the “Display” button for 3 seconds and then use the “+” or “-” to set the clock to a 12 hour or 24 hour time format. Then hit the
“+” or “-” to scroll the time up and down. Hit “Display” again to lock in the time you set.

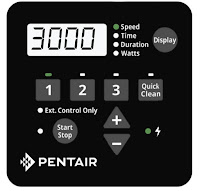
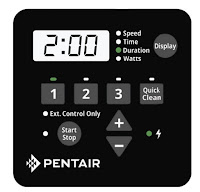
The pump comes with a preset default programmed run time:

You can just use the default run time or simply program one of your own. One thing to note and it is important: the pump will not run at all unless you hit the “Start, Stop” button. You will see a green LED light once the pump is turned on by hitting the “Start, Stop” button. Just remember that after initial set-up.

Also not that each SPEED button must have a program run time. If you only want to run 2 speeds, simply set one of the three SPEED buttons to 0 RPM. Just use the “-” button until the RPM zeros out on that button. IT doesn't matter if that SPEED has a run duration, at 0 RPM it will not engage.

To enter a Custom Schedule make sure the “Start/Stop” button is not illuminated. Now you can program each button by pressing it once. For example:

Hit SPEED 1 “1” button, the LED will blink – now use the “+” and “-” button to set the RPM. Press the button “1” again and now you can set the start time of SPEED 1. Use the “+” and “-”
Press “1” button again and now you can set the run duration – use the “+” and “-” button to set the run duration.

You would simple repeat this process for SPEED 2, SPEED 3 and the “Quick Clean” button.

The “Quick Clean” button is used as a “Time Out” button found on other Variable Speed pumps. By hitting this button you override any program set time and if the pump is off, it will turn on. You can set the “Quick Clean” button to any speed and duration but I recommend 3450 RPM for 3 hours. This is a good button to press when you add chemicals to your pool or when you want to use your attached spa. The 3450 RPM is the pumps full 1 ½ HP speed.

I also touch on using the FlowVis Flow Meter to set your pumps run time specifically for one cycle of water. Using a flow meter like the FlowVis will allow you to set your pumps run time exactly in order to maximize your energy savings. Without a flow meter you are really just guessing when you set your Variable Speed pump. So I highly recommend installing one when you purchase the pump.

SUPERFLO® VS Variable Speed Pump - Overview & Features: https://youtu.be/QJK0kVPpEoE
SUPERFLO® VS Variable Speed Pump: Plumbing in the Pump: https://youtu.be/Pb1OTS0nYMg
SUPERFLO® VS Variable Speed Pump Wiring and Electrical:
FlowVis® Flow Meter - H2flow Review & Overview: http://youtu.be/8WFXje-NWBY
FlowVis® Flow Meter Retrofit Kit Installation Guide: http://youtu.be/hsH2I06G_-A
FlowVis® Flow Meter - Plumbing in the Complete Valve: http://youtu.be/3cvUP6n3xvQ

FlowVis Flow Meter to Set Your Pool Pump Run Time: http://youtu.be/aE1Pc6GisUw

Monday, February 6, 2017

Installing a Pentair SUPERFLO® VS Variable Speed Pump: Plumbing in the Pump

Installing and plumbing in the Pentair SuperFlo VS pump is not very difficult. But Pentair will not honor the 2 year warranty and will void the warranty unless the pump is installed by a pool service professional. So you can do it yourself with that in mind. The video covers the complete plumbing installation at this service account.


Why Pentair is voiding the warranty if a homeowner installs the pump is a complicated matter. One, they are trying to protect the pool service industry and second they don't want to warranty improper or faulty installation. I can talk about the legality of doing this (which is very gray), but it would take up this whole article. I will probably save that discussion for another Blog article.


The pool PVC pipes at this pool are over 40 years old so I had to do some creative inlet plumbing.  If I cut the elbow off and went straight to the pump there was a great chance the pipe would snap while I cut it and then I would be jack hammering cement. Even when I was cutting the pipe off at the elbow it was moving quite a bit and making me very nervous.

It was a good decision because when I installed a new filter here a month later the discharge pipe snapped off on me when I removed the old filter. I have little doubt that if I would have cut the elbow off, the pipe going into the cement would have cracked under the strain.


This particular pool had 1 1/2” PVC plumbing. So there was one additional plumbing part that was needed and that was a 2” PVC to a 1 1/2” PVC Bushing Reducer. This part was used at the included 2” unions to reduce them down to 1 1/2”. For a pool with 2” plumbing you will not need them.

So before you start make sure you have plenty of elbows, couplings, straight PVC pipe (Schedule 40) and a tool to cut the PVC pipes. I like using a PVC Pipe Cutter but a Hacksaw will also suffice. You will also need PVC Cement, I like using the Grey Pool Heavy as it allows for longer drying time when you apply it to make tweaking the fittings easier. PVC Primer is also good to apply to give the pipes a tighter fit. And you will need sand paper to sand off any paint and a cloth to wipe off the PVC pipes.

You will also need a Sharpie marker and a ruler to mark the pipe cuts. The Sharpie can also be used to mark the angle of the elbows so that you can get everything to fit together at the proper angle.

At this pool there was a complicated matter of the pool equipment being below the pool water line. This means that gravity will push the water out of the pipes and when you remove the old filter the pool will drain down either below the skimmer or even below the return lines. To prevent this you will need to plug off the skimmer and return lines.

For the skimmer you can use a 1 1/2” threaded drain plug. In some cases you can stuff a rag or tennis ball in the bottom opening to stop the flow. At this
pool there was a check valve in the form of the FloVis in front of the pump that stopped the flow of water back from the skimmer.

The return lines can be plugged with threaded 1 1/2” plugs if your lines are threaded in the pool walls. There are also expansion plugs for snub pipes, but here I just used a type of rag that gave the lines a complete seal. This is important because gravity will push the water out of the return lines so that plumbing will be impossible with the water running out of the cut pipes.

If your pool equipment is at the pool water level or above it then these steps won't be necessary. The water will not run back into the equipment once you cut the pipes. But if your old pool filter sits below the pool water line, these additional steps are critical.

I like doing dry fittings when I do installs to make sure everything will fit together nicely once I apply the PVC Cement. I also like to mark the angle of the PVC Elbows so that once I remove the dry fitting I will be able to cement everything at the correct angle. If you make a mistake it is no big deal. You can just cut the straight PVC pipe and add a Coupling and adjust the angle.

I like to use a liberal amount of PVC Cement when I do the fittings. If you use to less there is a great chance of a leak developing. If you use too much simply wipe off the excess. You will paint the PVC pipes at the end so it doesn't matter. I just caution you to use a good amount on each fitting to prevent future failure.

The dry time on the PVC fittings vary based on size but I always give my installs at least 24 hours to dry. In this case I couldn't return for three days so I left everything off for that period. If you turn on the pool pump too soon the pipes may develop leaks. 24 hours is always the safest policy.

I also like installing the FlowVis Flow meter at all of my Variable Speed pump installs to get to the correct GPM to maximize energy savings. You can purchase the FlowVis 1 1/2” here: https://www.amazon.com/gp/product/B00SAP811W?ie=UTF8&tag=swimmingpooll-20&camp=1789&linkCode=xm2&creativeASIN=B00SAP811W


Related videos:
SUPERFLO® VS Variable Speed Pump - Overview & Features: https://youtu.be/QJK0kVPpEoE
SUPERFLO® VS Variable Speed Pump Wiring and Electrical:
SUPERFLO® VS Variable Speed Pump Operating and Programming: https://youtu.be/JzDw3abs6O8
FlowVis® Flow Meter - H2flow Review & Overview: http://youtu.be/8WFXje-NWBY


Saturday, February 4, 2017

Swimming Pool Help

There are many websites and Blogs related to the care of your Swimming Pool. Any homeowner who has the time can apply him or herself to the task of maintaining their own pool. I have a number of sites that I have created to help out homeowners and  pool service professionals.

My YouTube Channel has many helpful videos and with a library of over 600 videos you are sure to find the help you need with your pool. The video topics range from Pool Chemistry, Pool Cleaning, Automatic Cleaners, Repairs and Installation and just about everything swimming pool related.

YouTube Channel: https://www.youtube.com/user/MrDgvb1


I actually have a Blog Article in which all of my videos are indexed for you so that you can find the video you need for your specific problem.

Video Index:

You can also just visit my YouTube Channel and spend some time browsing my videos. I have a number of playlist set up also to help you find what you need. I know that having so many videos can make it hard for you so you can also simply email me and I will direct you to the right video or resource for your problem - swimmingpoollearning@gmail.com

I also have and extensive amount of Blog articles that you can access here on my Blog. If you also like to read about a pool issue or a product I have reviewed my Blog is a great resource. I try to transcribe the more pertinent info from the related video and the Blog article often will contain additional information not found in my YouTube Videos.

MyWebsite:
https://www.swimmingpoollearning.com/
 My website contains many pages of information that is set up to help you with all of your pool care needs. You will also find a list of Resources, Pool Service Professionals in your area, product links and much more. I set up the site so that just about everything you need can be found in one place. Click on my “About” tab to learn more about me and what I do.

You can also follow me on FaceBook and Twitter and I respond quickly to direct messages on both sites.

Twitter: https://twitter.com/Mrdgvb1

POOL SERVICE PROFESSIONAL:
If you are a pool service professional I also have a Patreon site where you can support me for as little as $10 a month and text me directly where I will help you one on one in real time. I also offer a Group Liability Insurance Rate of $50 per month.

Patreon:

So I have set up many ways to help you with all of your pool care and pool business needs. Please feel free to contact me directly if you have any questions not addressed from my YouTube Channel, Blog and Website.


Friday, February 3, 2017

Cleaning Your Pool After a Wind Storm

In this article I take you through the steps in cleaning up a pool after a major wind storm. Probably the worst thing that can happen is having your pool hit by a wind storm. The mess a wind storm leaves behind is discouraging and painful.


Just about every year we get hit by several major wind events called the Santa Ana Winds. Wind gust can vary from a mild 50 mph to near 80 mph. On Nov 30th 2011 we had a wind event where the Santa Ana winds collided with an Offshore Flow resulting in sustained wind gusts of over 100 mph. To say the pools on my pool route were thrashed was an understatement. The photos in the opening are from the pools on my route the week after that storm.  So I have a lot of practical experience when it comes to cleaning a pool up after the winds.


Preparing for the Storm:
If you are expecting sustained  wind gusts of 50 mph or higher it may be a good idea to turn your pool completely off for that to prevent your system from clogging. With wind that strong your pool system can't do much anyway. If the winds are in the 25 to 35 mph range - usually your pool will be fine.

Removing anything around the pool is a good idea to prevent it from being blown in. Getting stuff off of the pool bottom can be challenging so it is best if nothing goes in there in the first place. So lower down the umbrella and move all patio furniture from around the pool.

Step One:
The first priority is the pool surface. You want to skim the top off so that you can get the system up and running as soon as possible. This includes emptying the skimmer and pump baskets also. On my pool route I will get all the pools clean on top the first week after a storm and worry about the bottom the following week. So as a homeowner if you have time only to clean the top at the moment that is perfectly fine. The stuff on the bottom can wait - it isn't going anywhere and will not hurt the pool.

Step two:
Having a high chlorine level is essential when your pool is full of leaves.The organic debris can use up quite a bit of chlorine and the leaves may temporarily stain the pool bottom if the chlorine level is too low. Sometimes after a windstorm in my area it will rain during that same week so having a solid chlorine level is a must.

Step Three:
Cleaning the bottom can be a real chore especially if your pool gets wasted. I use the Power Vac PV-2100 on my pool route to handle the pool bottom. It is about $1,000 so it is an investment. But a sound one that will save you loads of time and energy. If you are a homeowner whose pool is constantly ruined by debris from the winds in your area, it would not be a bad long term investment to pick up a Power Vac.

If you live in an area like the high Desert or Arizona and your pool mainly gets dirt from the winds, then a portable pool pump might be the answer for a quicker and more effective clean-up.  Especially if you have a DE or Cartridge filter and can't vacuum in "Waste Mode." It is easy to build and affordable.

The Leaf Bagger is a handy tool for pool bottom clean-ups. It attaches to a garden hose and uses water to push leaves and debris up into the bag. The only drawback is you are adding water to your pool and the hose is a pain to drag around.

Water Tech makes a good battery powered Leaf Vac that is effective and can be used in place of a Leaf Bagger.

And last, you can just use a large professional quality leaf rake to skim everything off the bottom. This is time consuming and takes some practice but not a bad method.

Related Videos:
Portable Clean-Up Pump to Vacuum out a Pool: https://youtu.be/bU8No8Jfjrw
Prime A Portable Clean-Up Pump: Installing a Check Valve: https://youtu.be/raZH8QmJses
Power Vac PV2100 Set Up and Walk–Through: https://youtu.be/rkCSfX8dwK8
Power Vac PV2100 Portable Professional Swimming Pool Vacuum Cleaner: https://youtu.be/xGY7tFUDFGM
Power Vac Large Service Cart for PV2100, PV220 & PV2500 Vacuum: https://youtu.be/y9ORwr_DQtI