Monday, January 30, 2017

Pentair SUPERFLO® VS Variable Speed Pump (works on 115/230 Volts) - Overview & Features

The Pentair SuperFlo VS Variable Speed pump is unique among Variable Speed Pumps in that it works off of 115 Volts as well as 230 Volts. It is the only Variable Speed pump that can convert the voltage which makes it perfect for older pools. The SuperFlo VS has plenty of power and is rated at 1.5 HP.


Although the SuperFlo is not as powerful as the IntelliFlo VS pump it is adequate for most pools. The SuperFlo pump was originally designed for older pools with copper pipes. But at 1.5 hp, this one moves water extremely well in your standard pool. At full speed it generates the 1.5 HP speed for your spa or to get a water feature moving.

Of course the benefits of a variable speed pump is the ability to adjust the speed of the pump, known as RPM down in order to conserve energy. So you will rarely be running it at full speed which is 3450 RPM. So the pumps HP, although important, is not the overriding factor when looking to purchase a VS pump.

The SuperFlo VS is a great looking pump. Compact, good size pump basket, an easy to program controller and a low profile all make this a solid VS pump for your pool. And it comes backed by a two year warranty and is a very reliable pump.


Default Program 
The controller on back is very easy to program. You can refer to my separate video on programming the pump. It comes with a factory default program so it is very easy to set up. You can also program in your own run time and RPM speeds if you wish. Pentair has come a long way in making this a very user friendly pump.

As far an energy savings, in most cases within one year you will make all of the money back on the price of this pump and more. The energy savings of running the pump at a lower RPM are exceptional. A 1.5 HP pump running each hour is like having twelve 100 watt light bulbs on. Compare that with running the SuperFlo VS pump at 1400 RPM which is like having two 100 light bulbs on. Over the course of one year that translates into a huge savings on your energy costs.
Installation is very easy and the SuperFlo VS comes with two 1 1/2” unions. If you have 2” plumping you will need to purchase 1 1/2” to 2” fittings. It's compact size will allow it to fit into most equipment areas without problems. The two included unions make for an easy plumbing installation.

The electrical is also very simple. There are just three wires inside the pump and it will accept power from both your 110 Volt breaker or your 220 Volt breaker. It converts the power automatically so there is no complex wiring or switches to change. The back is very easy to access and work on.

I also touch on the FlowVis Flow Meter in the video. The FlowVis is a great way to know the exact flow to the pump and this will allow you to know the exact gallons per minute (GPM) the pump is moving at each set RPM. This will allow you to set your pump speed to get at least one cycle of water through the filter each day. One cycle of water is all of the pool water passing through the filtration system.

The SuperFlo VS would be a great purchase if your older single speed pump is on the way out. It is affordable and will save you a lot of money on your energy costs. It is also very user friendly and backed by Pentair's reputation of building reliable pool products.

Note that I use 110/ 115 /120 Volt references - they all mean the same thing as well as 220/230/240 volts.


To purchase the SuperFlo VS on Amazon.com:
https://www.amazon.com/Pentair-342001-SuperFlo-Variable-Horsepower/dp/B00PKHX2BM/ref=as_sl_pc_tf_til?tag=swimmingpooll-20&linkCode=w00&linkId=a660c538d2a07a911f2c7c1b8597ba63&creativeASIN=B00PKHX2BM

To purchase the Complete FlowVis on Amazon.com:

Related Videos:
SUPERFLO® VS Variable Speed Pump: Plumbing in the Pump: https://youtu.be/Pb1OTS0nYMg
SUPERFLO® VS Variable Speed Pump Operating and Programming: https://youtu.be/JzDw3abs6O8
SUPERFLO® VS Variable Speed Pump Wiring and Electrical:
FlowVis® Flow Meter - H2flow Review & Overview: http://youtu.be/8WFXje-NWBY
FlowVis® Flow Meter Retrofit Kit Installation Guide: http://youtu.be/hsH2I06G_-A
FlowVis® Flow Meter - Plumbing in the Complete Valve: http://youtu.be/3cvUP6n3xvQ


FlowVis Flow Meter to Set Your Pool Pump Run Time: http://youtu.be/aE1Pc6GisUw

Monday, January 23, 2017

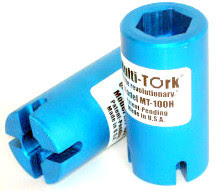
Multi-Tork MT-100H Socket for Hayward Filters & Harmsco Filters

This is the Multi-Tork MT-100H for the Hayward SwimClear and Pro-Grid DE filters. It also is reverable and will work on wing nut closure filter systems such as Harmsco, Solberg and others. This is the latest addition to the Multi-Tork family of filter sockets which make filter cleaning a breeze.


MT-100H fits:

Hayward SwimClear Cartridge Filters
C2030
C3030
C4030
C5030
C7030Sw

Hayward Pro-Grid DE Pool Filters
DE2420
DE4820
DE6020
DE7220


If you are interested in purchasing the MT-100H you can contact Tal the owner of Multi-tork and he can let you know where to get it from.

888-929-7818 Tal

He is a pool guy also who created the Multi-tork sockets several years ago to help mke filter cleaning easy on everyone. The video also features the other sockets and you can find the links to purchase these on my website:


I suggest the value pack which includes the MT-100, the MT-50 and the MTJ-770. The Value pack is called the MT-301:


The MT-100 and the MT-100H are both made out of Anodized Aluminum and are super strong. I have had my MT-100 for over two years and use it on at least 80 filters a year and it is just like new. The MT-50 is super handy also for the old Pentair 2000 Series Filters and the 4000 Series Filters. And of course the MTJ-770 is essential for the Sta-Rite System 3 filters.

The MT-100H when flipped over will fit the wing nut closure filter systems such as Harmsco, Solberg and others. These filters can be found throughout Europe and on some Commercial Pools in the US also. 

If you are a pool service company you will love these sockets. I suggest a drill with a lot of power so you are probably going to pay something in the $100 range for a good cordless drill. The Stanley drill I use in all of my videos is a good example. It is over 2 years old and has plenty of power over 400 lbs of torque per inch. It is discontinued however once Black & Decker took over Stanley but here is a similar drill by Makita with 480 lbs of torque:


The torque is important because some of the nuts need a lot of force to secure the clamps. Many of the Hayward and Pentair filters require this to get the clamp on securely. So go with a powerful cordless drill if you use the Multi-Tork socket.

A quick word on Tal. We have become good friends over the years and I see him at my local pool show each year. He does a lot of the pool shows, the two in Florida, Las Vegas, New Orleans, Northeast pool show and the Western Pool & Spa Show. If you attend the shows be sure to stop by his booth and pick up a set of the Multi-Tork tools.

Now that I have the MT-100H I can do almost all of my pool filters using my cordless drill to get the clamps on and off quickly. This saves me at least 5 minutes per pool and if added up over the course of the year that is a lot of time. Something like 12 hours if you take apart 80 filters every six month or 160 year. That is half a day of work. Please see my other Multi-Tork videos to learn more:

Multi-Tork Filter Socket Tool - For Faster Filter Cleaning: http://youtu.be/aI-rPOSMv-k

Multi-Tork MT-100 Double-Hex Anodized Aluminum Pool Socket: https://youtu.be/1cRFHEddYVM


Monday, January 16, 2017

Polaris 8050 Sport: Unboxing,Caddy Assembly & Troubleshooting Tips

In article  I go over what comes in the Polaris 8050 Sport box and how to assemble the Premium Caddy. The Polaris 8050 Sport is a retail pool store cleaner only and is only available at your local brick and mortar pool store. The Premium Caddy is pretty easy to assemble.


If you don't think you can assemble it without help for any reason, the pool store can assemble it for you. That is one of the benefits of buying something at a retail store. But if you want to do it yourself the video will go over it step by step for you.

The Polaris 8050 Sport comes packed very nicely in the box and included along with it is the control unit, instruction manual, warranty card, quick start guide and the parts for the Caddy.  The Polaris Caddy is by far the easiest to assemble, the most sturdy and compact Caddy on the market. The video is simple to follow and you can play it along side yourself as you build it.

If you haven't purchased a robotic cleaner and are in the market, you can watch my overview video of the Polaris 8050 Sport to see this cleaner in action:


Since there isn't much to say about the Caddy I will include some basic troubleshooting tips here in this article for you.

The Polaris 8050 Sport should be inserted into your pool at the direct center of the pool for best cleaning coverage. You don't want to insert the cleaner on one end of the pool, especially if the pool is very large.

To prevent cord tangling you should do these two things. First, add only the cord needed to the pool for the cleaner to get to the furthest point. Don't put all of the cord in the pool unless it is needed. Leave the excess cord on the Caddy.  Second, always remove the cleaner from the pool after the cleaning cycle and store it on the Caddy with the cord spooled around the cord holder. Doing these two things will prevent future cord tangling.

If the cleaner is climbing out of the pool when it climbs the walls and sucking in air, you can fix this easily. On the Controller there is  “Surface Control System” with four settings.  This controls the climbing strength of the cleaner so simply lowering it down one setting should solve this problem. If it is not climbing high enough, set it one setting higher.

If the cleaner does not climb the walls, run your hands along the walls and see if there is any algae build-up. This will make the walls slick and prevent the cleaner from climbing all the way up.

The debris chamber is designed to pick up very fine dirt so it is a good idea to clean it after every use. If the debris chamber gets coated with fine dirt the cleaner may not climb or clean the pool effectively. The cleaner may also float off of the ground if the chamber is really clogged up. So keeping the debris chamber clean is essential.

You may notice the cleaner sitting on the pool floor for up to 20 seconds doing nothing. It will do this often during the cleaning cycle. There is nothing wrong with the cleaner, stopping and readjusting is all part of the cleaner's program.

The Polaris 8050 Sport comes with a two year warranty which is a solid warranty for any type of pool product. For more help and Troubleshooting you can contact Polaris directly.

Thursday, January 12, 2017

Polaris 180, 280, 380, 3900 Sport Tips and Troubleshooting

The Polaris Pressure Side Pool Cleaners are the top choice in their category. Polaris dominates the Pressure Cleaner market and for good reason. Here are some troubleshooting tips for you for the Polaris 180, 280, 380 and 3900 Sport.


First, you must have a separate pump plumbed in for the Polaris cleaner or you cannot install this cleaner. It needs it's own pump to work off the pressure (return) side of the pool verse the suction skimmer/side port side.

I have several customers with these cleaners installed (Two with Polaris 180 models which means that after 30 years they are still working fine) and all work off the same principal. The Polaris pump sends high pressure to the line the Polaris is attached to spinning the wheels and moving the cleaner. Every few minutes the Backup valve activates and reverses the cleaner (prevents it from getting stuck in one area).

Here are some troubleshooting tips:

Hose length is important. Too much hose and the cleaner will not work properly.

The Back-up Valve must be installed 14-20 inches from the cleaner and the water opening (where water shoots out of) must be facing the cleaner and not away from it. These valves tend to fail often. To know if it is working properly, lift it out of the water when the Polaris is running. If water is continuously shooting out and never stops, it has failed and you need a new one, otherwise the Polaris will not run.

The Quick Disconnect that attaches the Polaris to the wall also has an adjustment on it, make sure it is not all the way open or there will not be enough pressure. They tend to crack under the pressure so check it periodically to see if water is shooting out of it from a crack.

Sometimes when you clean the filter, some element will enter the Polaris return line. Simply disconnect the wall connector and clean out the small debris basket (looks like a Thimble).


If you find the Polaris on it's side in the bottom of the pool, the rear float has probably failed and is full of water. Simply remove it and install a new one. These are the most common problems you will have.

If the cleaner starts and runs for a few seconds then stops, then runs again and stops; check the skimmer basket & pump basket for debris (possibly low water too), if pool does not run the Polaris will not either since it works off the return water pressure.

If the Polaris hose is tangled and doesn't seem to unwind, just add a Swivel to the hose by cutting the hose with a blade, and inserting a swivel with 2 nuts to hold it in. Make sure the arrow on the swivel is pointed towards the Polaris and don't add a swivel within 10 FT of the Polaris (otherwise it will do 360 all day).

Note:  Also if the Polaris wheels are not moving, more than likely the bearings are bad, very easy to change. Just take off the plastic nut, the wheel comes off, pop the old bearings out, pop in the new ones and you are set. If you have a Polaris 360 or 380 the drive belt may also be worn or broken. If you have a Polaris 180 or 280 the drive shaft might be stripped, especially if it is over 10 years old. If you have a Polaris 3900 Sport and it is not moving, the chain may have come off.

These are really reliable cleaners but like everything else do do eventually wear out and break down. If you need more help just contact me and I will be happy to help.

Monday, January 9, 2017

Gator Auto-Skim

This is the Gator Auto-Skim Surface Skimming System for your suction side automatic pool cleaner. The Gator Auto-skim will work with all suction side pool cleaners and will skim the surface debris while the automatic cleaner works on the bottom of the pool.


I received the Gator directly from the manufacturer to test it and see what I thought. I test a lot of products for my YouTube Channel and the ones that are good, I put to film. Believe me, there have been some real duds and those I just keep in my garage.

The Gator is very effective for what it is designed to do. It connects to your suction side cleaner pool hose 2-3 hoses from the head of the cleaner. So as the cleaner is moving along the bottom it is dragging the Gator around the pool.

The Gator has a regulator valve in the bottom that will pull in water much like the regulator valve at your skimmer. This allows the Gator to suck in surface debris and act as a mini-skimmer, floating around the pool and pulling in surface debris.

It is very well designed and will pick up surface dust, bugs and leaves with no problems. It is not designed to pick up very large leaves, since the opening for the regulator is not large - figure it will pick up leaves similar in size to what your cleaner picks up off of the pool floor.

Note that the Gator is designed for a suction side pool cleaner which is the type that connects directly to your skimmer or side port/ vacuum port and runs off of your pool pump.  Some popular brands are the Pentair Kreepy Krauly,  the Hayward PoolCleaner, the Hayward Navigator, the Zodiac G2 and many more. The Gator will work with all of them.

It is a very effectively designed product and it works very well in my testing. There are some real benefits of this if your cleaner is connected at your skimmer. This will replace the regulator valve at the skimmer which over time will allow debris into your pump basket and clog it. The Gator moves the skimmer regulator valve out of the skimmer and into the Gator unit.

This means that once you replace your skimmer regulator valve with the hose connector, all of the debris will now go directly into the Gator. So if you have an inline canister like the Hayward W530 or the Zodiac Cyclonic Canister; all of the leaves and debris will be trapped by the canister and not go into your pump basket. So the skimmer is effectively bypassed by the Gator.

If you have a cleaner connected to the side port/ vacuum port of the pool, you can still benefit from the Gator. As the cleaner is moving in the pool the Gator will pick up debris on the surface that may not make it to the skimmer and fall to the bottom. The Gator will also skim the fine dust and bugs off of the pool surface leaving the surface spotless.

The Gator is also highly adjustable so if you connect it to your skimmer and notice that the cleaner is moving too slow, you can turn the Gator over and adjust the tension plate of the regulator. A higher setting on the tension plate will increase the suction to the cleaner making it run faster and decrease the suction to the Gator. A low setting will conversely slow down the cleaner and speed up the Gator's skimming speed.

For the side port./ vacuum port installation, simply adjust the valve until the Gator is getting the proper surface skimming suction. Included with the Gator is a flow gauge and you should use this when setting up the Gator. A good suction reading for the Gator is and “A” or a “B” on the flow gauge. If you are getting a “D” reading, clean the filter, clean the pump basket and make sure all of the pools suction is turned towards the skimmer (if that is where you have the Gator connected). Again for the side port, just adjust the valve by the equipment to achieve proper suction.

The Gator is a pretty innovative product and if your pool has a lot of surface debris and you have a suction side cleaner, I would recommend looking into this product for your pool. With the Gator properly adjusted, your cleaner will be able to clean the pool bottom while the Gator skims the surface.

The Gator is sold by Only About Innovation (OAI) which is also the maker of the SkimmerMotion which I previously reviewed:

Skimmer Motion™ - Automatic Pool Skimmer Review: http://youtu.be/PTxctNbjvN8
Skimmer Motion™ Installation and Set Up:  http://youtu.be/XrdKTwPIpzM


Thursday, January 5, 2017

Cloudy Pool Water: Causes and Cures

In this article I go over some of the most common causes of cloudy pool water. There are only a handful of common reasons why your pool water will become cloudy.  Once the problem is corrected the pool water will return to a clear state within a matter of a few days.

This video is my most popular one on YouTube to date:


I am often asked if a clarifier is needed and in most cases you won't need one. I use them very sparingly on my route and will add it when a customer is having a party or if I need to clear the pool up quickly for an event.  I know pool stores push this product a lot and they do work if you need to clear it up quickly. Sometimes if you have a sand filter a clarifier will help clump the particles together and allow for better filtration.

Cloudy Pool Water: Causes & Cures


This video covers some of the most common causes of cloudy pool water. There are only a handful of common reasons why your pool water will become cloudy.  Once the problem is corrected the pool water will return to a clear state within a matter of a few days.

I am often asked if a clarifier is needed and in most cases you won't need one. I use them very sparingly on my route and will add it when a customer is having a party or if I need to clear the pool up quickly for an event.  I know pool stores push this product a lot and they do work if you need to clear it up quickly. Sometimes if you have a sand filter a clarifier will help clump the particles together and allow for better filtration.

#1 Cause:  No chlorine in the pool. Seems like a simple thing but it happens all the time. If you get busy and forget to check the pool, unusually hot weather, heavy rain or a pool party all can zero out your chlorine level.

Solution: Simply bringing the level of chlorine up to 10 ppm in your pool will reverse the cloudy water - known as "Shocking the pool." Also run your pool for a longer time to help speed up the process.

#2 Cause: Combined Chlorine. Ever smell a chemical like smell at a hotel or the local YMCA? Chlorine has no odor and what you are smelling is Combined Chlorine. Chloramines are what is now in the water and not only do you get an ammonia smell but the water will be cloudy.

Solution: Raising the chlorine to 10 ppm will cure this. Sometimes you will need to raise it to 20 ppm, basically super chlorinate the pool to kill the Ammonia that has formed in the water.

#3 Cause: Not running the pool long enough. You need at least one cycle of water through your pool each day. One cycle is all the pool water going through the pool filter and then back into the pool. If the chlorine is fine but the water is cloudy chances are you are not running the pool long enough.

Solution: Set your pool to run longer.

#4 Cause: A filter leak. This happens mainly with D.E. filters and a filter leak can cause your water to be very cloudy or partially cloudy.

Solution: Take the filter apart and inspect it and if there are broken grids simply replacing them will solve the problem.

#5 Cause: Adding Soda Ash or Baking Soda to the pool. When you add base to the pool it can become cloudy for a short period of time. After a few hours or by the next day it should clear up. A good way to avoid this is to add the base directly to the skimmer.

Solution: Manually vacuum up the dust on the pool bottom, pool will clear up very quickly,

#6 Cause:  High Alkalinity or High Calcium Hardness. Not very common but this could also cause your pool to be cloudy. But these need to be very high for this to happen.

Solution: Add Muriatic Acid to lower down the Alkalinity.

These are the basic causes for cloudy pool water and they are easily corrected. It could also be something unusual but these are the most common causes I run into on my pool route.


Tuesday, January 3, 2017

Hayward TriVac 500 Set-Up and Istallation

This is the set-up and installation of Hayward's TriVac 500 Pressure Side Pool Cleaner. You will need a dedicated ¾ hp booster pump for the TriVac 500 cleaner. If you have a booster pump for a Polaris or Pentair Legend cleaner it will work fine for the TriVac 500.


I filmed a review of the TriVac 500 awhile back and I noticed that it has some negative reviews on Amazon in particular. I think this stems from the improper installation of the cleaner for the most part. As far as pressure cleaners go, the TriVac 500 is a bit more difficult to set up then others. For the Polaris you just drop it in and usually you are fine. The TriVac 500 needs just the right water pressure to work effectively in your pool.

The ideal water pressure is plus or minus 23 on the gauge. You achieve this by simply turning the arrow on the wall fitting one direction or the other to reduce or increase the water pressure. It the cleaner has too much pressure it will climb out of the pool often and you want it to stay on the bottom and the coves of the pool. If the pressure is too low it will get hung up at the steps or a corner in the pool.

If the water pressure is too high or too low the cleaner will not work effectively. So proper set up is essential in avoiding poor performance issues. If you follow the steps outlined in the video the cleaner should preform very well. The cleaner hose length is also important in the installation process. If the hose is too long or too short the cleaner will not clean the pool properly.

The TriVac 500 requires a dedicated return line and a 3/4 hp booster pump. If you have a Polaris or Legend cleaner you are replacing, the TriVac 500 can use that same pump and dedicated line. 

If you have a wall fitting adapter already in the wall from a Polaris or Pentair Legend cleaner, you can just use that fitting. The two notches match up with the TriVac 500 quick disconnect also. Just remove any blue or red plates from inside of it first if you had a Polaris before.

If you are installing the wall fitting in a pool that did not have a pressure cleaner before, I suggest using Teflon tape to prevent the threaded part from locking up inside the wall. Overtime calcium buildup will get into the threads, making it nearly impossible to remove later.

You can also adjust how much water is going to the tail of the cleaner. I like the tail flow to be low so that water isn't shooting out all over the pool deck. The tail basically serves as a sweep to get dirt and leaves off of the steps and out of the corners of the pool.

If you need to shorten the hose (optimal length is 2 feet of hose sticking out of the furthest point of your pool), don't cut from the hose going into the TriVac 500 but remove a section from the next hose down. If you need to add hoses you can order an 8 ft hose length online or thru Hayward.

Again with proper installation the TriVac 500 should preform very well in your pool. If you have any questions feel free to comment and contact me.

Hayward TriVac™ 500 Pressure Side Cleaner Review: https://youtu.be/L7Zh3GL5gMA